
Atari Combat, 1977
The Atari 2600 wasn’t the first home video game console with replaceable games, but it was the first to be widely successful. Introduced in 1977 as the Atari VCS (Video Computer System), and later renamed Atari 2600 in 1982, it eventually sold over 30 million units and established a new market that still endures today in the PlayStation and Xbox. Prior to the 2600, most video game systems were either coin-operated machines found in bars, or fixed-function devices limited to a few built-in games like Pong. Atari’s first home system was the beginning of a new age.
This wood-grained block of electronics preoccupied my young mind. I wanted one badly, but never succeeded at convincing my parents. I was eleven years old in 1982 when my friend Fred got an Atari, and I was sick with jealousy:
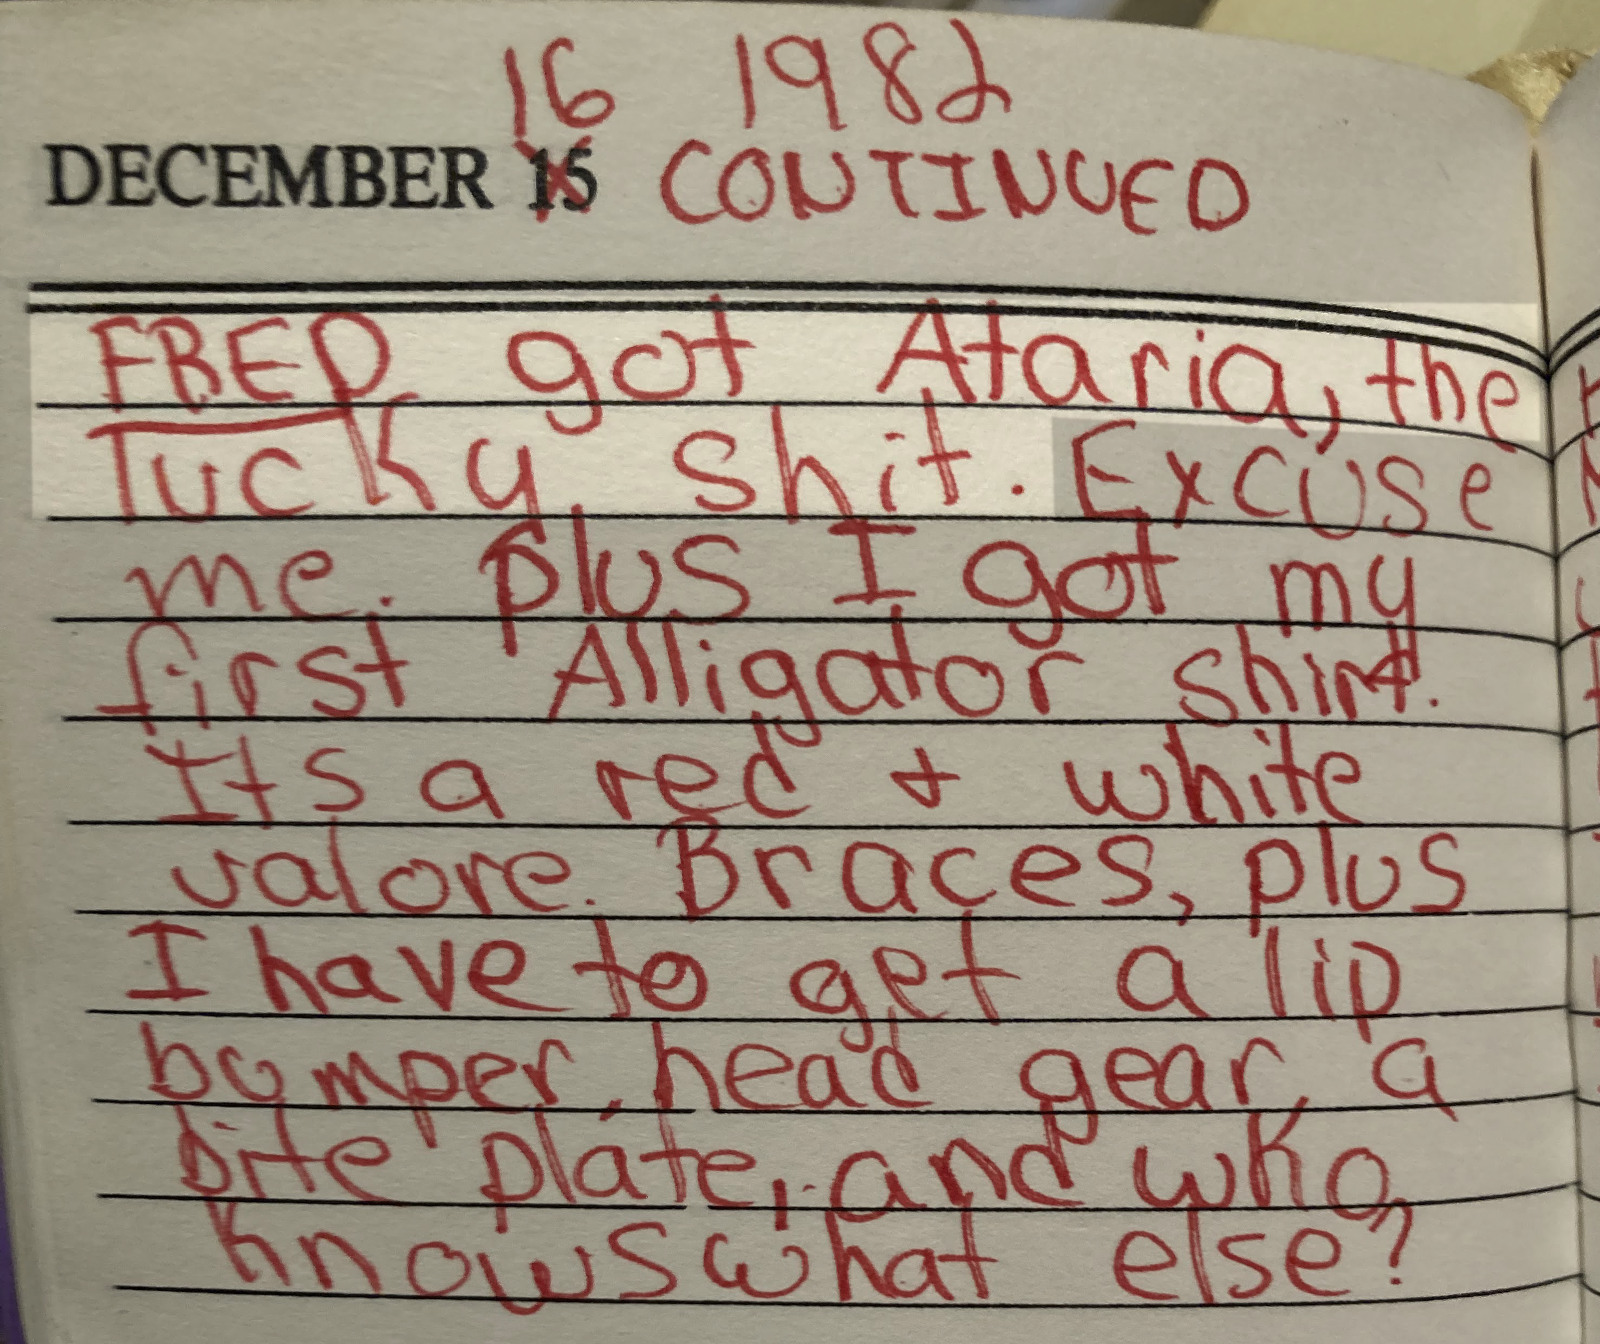
December 16 1982, arrival of Ataria (sic)
What a day! Not only did Fred get an Atari system, but I got braces and an Izod Lacoste alligator shirt.
Atari 2600 Hardware Overview
Recently over the holiday break, I became interested in the 2600’s hardware architecture and started reading everything that I could find about it. I knew that it was some kind of 6502-based system, and I’d heard mentions of “racing the beam”, but that’s as far as my knowledge went. I was shocked to discover how primitive the 2600 hardware was, even compared to contemporary 6502 systems like the Apple II, Commodore PET, and even Atari’s own 8-bit computers.
Inside that wood-grained box there were only three digital chips:
- 6507 CPU (pin-reduced version of the 6502)
- 6532 RIOT
- TIA (Atari custom IC)
Notably absent from this list was any RAM or ROM! The ROM came from whatever game cartridge was inserted – there was absolutely no built-in I/O helper routines or operating system, so it was up to the game programmer to provide everything. Game cartridges were limited to 4 KB and many early games were only 2 KB. Any of the photos on this page are vastly bigger than that.
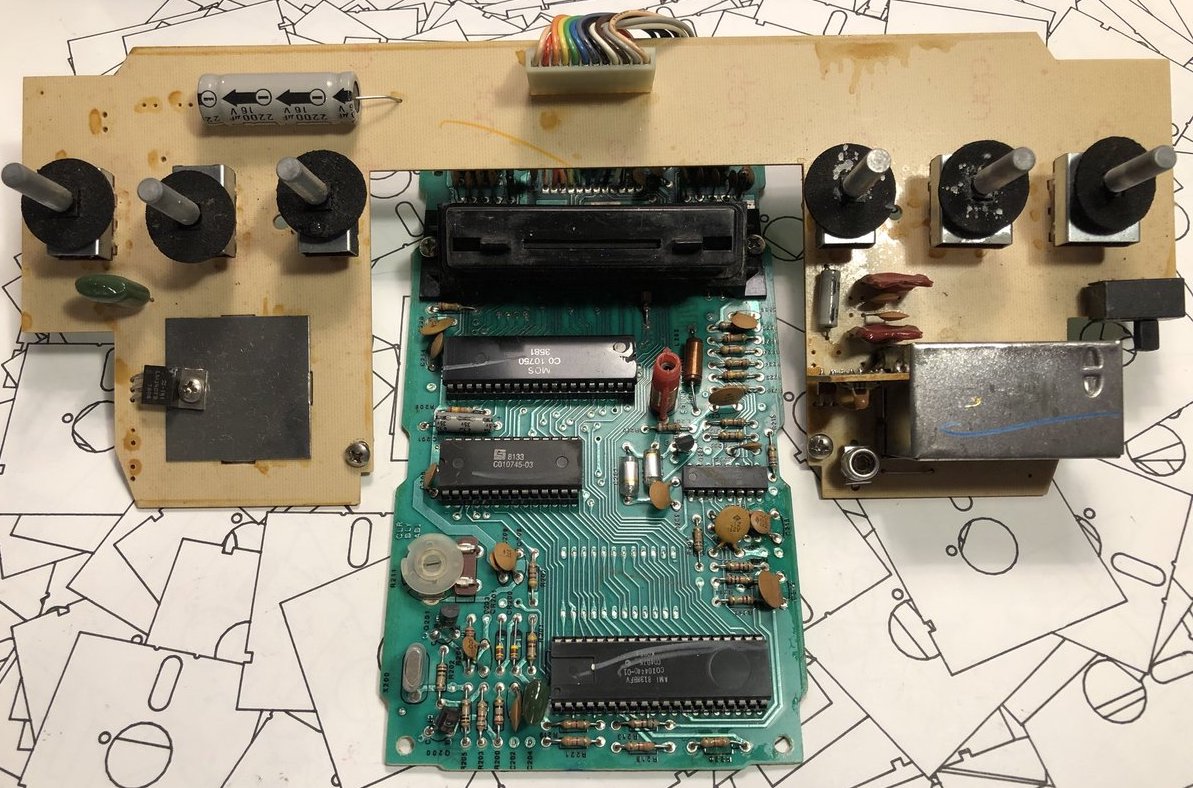
early version of Atari VCS circuit board
RAM was limited to the tiny amount of storage space built-into the 6532 RIOT chip – just 128 bytes. 128 bytes! That is… I don’t even… that is small. Like really, really small. I might have guessed 1 KB or 2 KB RAM, but 128 bytes is just in another category entirely. What’s worse, this tiny amount of RAM had to serve as both the scratchpad/heap and as the stack! Programmers got a few bytes for things like player and item locations, strength, score, and that’s all.
But hold on, because it was even worse than you think. This pin-reduced 6507 eliminated the 6502’s NMI and IRQ pins, so there was no hardware interrupt capability at all. Everything had to be accomplished with software timing and polling. For a real-time system built around the concept of racing the beam, this was just masochism.
And for the final kick in the nuts, there was no framebuffer. There wasn’t even a line buffer. The programmer only had a few TIA registers to play with and nothing more. Most graphics had to be generated by the CPU on the fly, at the very moment that the television’s electron beam was scanning past the pixels of interest. Even the VSYNC signal for the television had to be handled in software. With hardware like this, I’m surprised the Atari 2600 didn’t require a coal-fired steam engine or a wooden crank handle to boot the games! It’s crazy. I love it.
Inside the TIA Chip
The heart of the 2600 is Atari’s custom-designed TIA chip – the Television Interface Adapter. You can find the hand-drawn TIA schematics on the web if you’re curious how it works. The TIA internals look very strange to modern eyes, beginning with the extensive use of linear feedback shift registers where you would expect to find binary counters, for things like the horizontal sync counter or the sprite position registers. I’ve seen LFSRs used as random number generators in other 8-bit designs, but never as a general-purpose counter. These LFSRs also use two separate clocks, 180 degrees out of phase, which seems equally strange. Here’s the six bit horizontal sync counter:
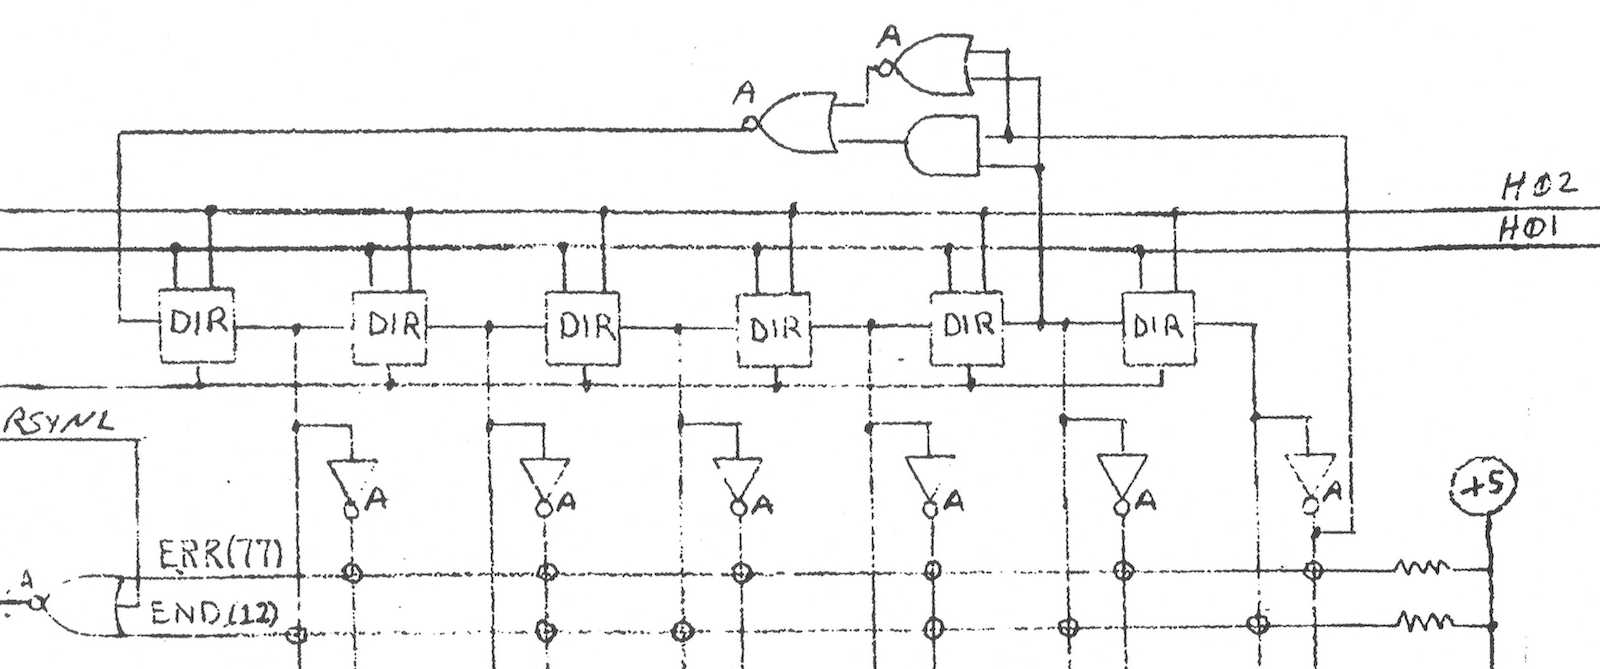
The chip designers must have had their reasons: maybe LFSRs were cheaper to implement or required fewer transistors than regular binary counters? If you just need a six bit counter, then ultimately it doesn’t really matter if it counts 64 states from 000000 sequentially up to 111111, or if it follows some other random-looking but deterministic sequence of states. Either way you can add logic to check for the terminal state and reset the counter when needed. If anyone has an idea why the TIA’s designers used LFSRs for this stuff, I’d love to hear about it. Fortunately the Atari 2600 programmer is mostly insulated from this LFSR funny business.
So how do games actually draw stuff? The simplest place to begin is with what Atari calls the playfield, and is effectively a background pattern on the screen. The TIA has 20 bits of register state which the programmer can modify, and which is used to create a one-dimensional low-resolution monochrome bitmap on the left half of the scan line. The right half of the line is either a copy of the left, or a mirrored copy. Want something completely different on the right side? Too bad. Want multiple colors? Too bad. The same 20 bits of playfield register state are used on every horizontal scan line, too. Want to display something different on each line? That requires constantly modifying the playfield registers, before each new scan line is drawn. There are only 76 CPU clock cycles during each scan line, and with most CPU instructions requiring 2 to 5 clock cycles, that doesn’t leave much time to do… basically anything.
This playfield behavior explains why so many Atari games have left-right symmetry in their backgrounds, walls, or similar content. Look at this image of Pitfall, and notice how the tree canopy, tree trunks, ground, pit, and underground cave all show left-right symmetry. These are all built from the playfield (plus additional tricks to be described later). The only sprites are Pitfall Harry, the vine he’s swinging from, the rolling log, and the scorpion.
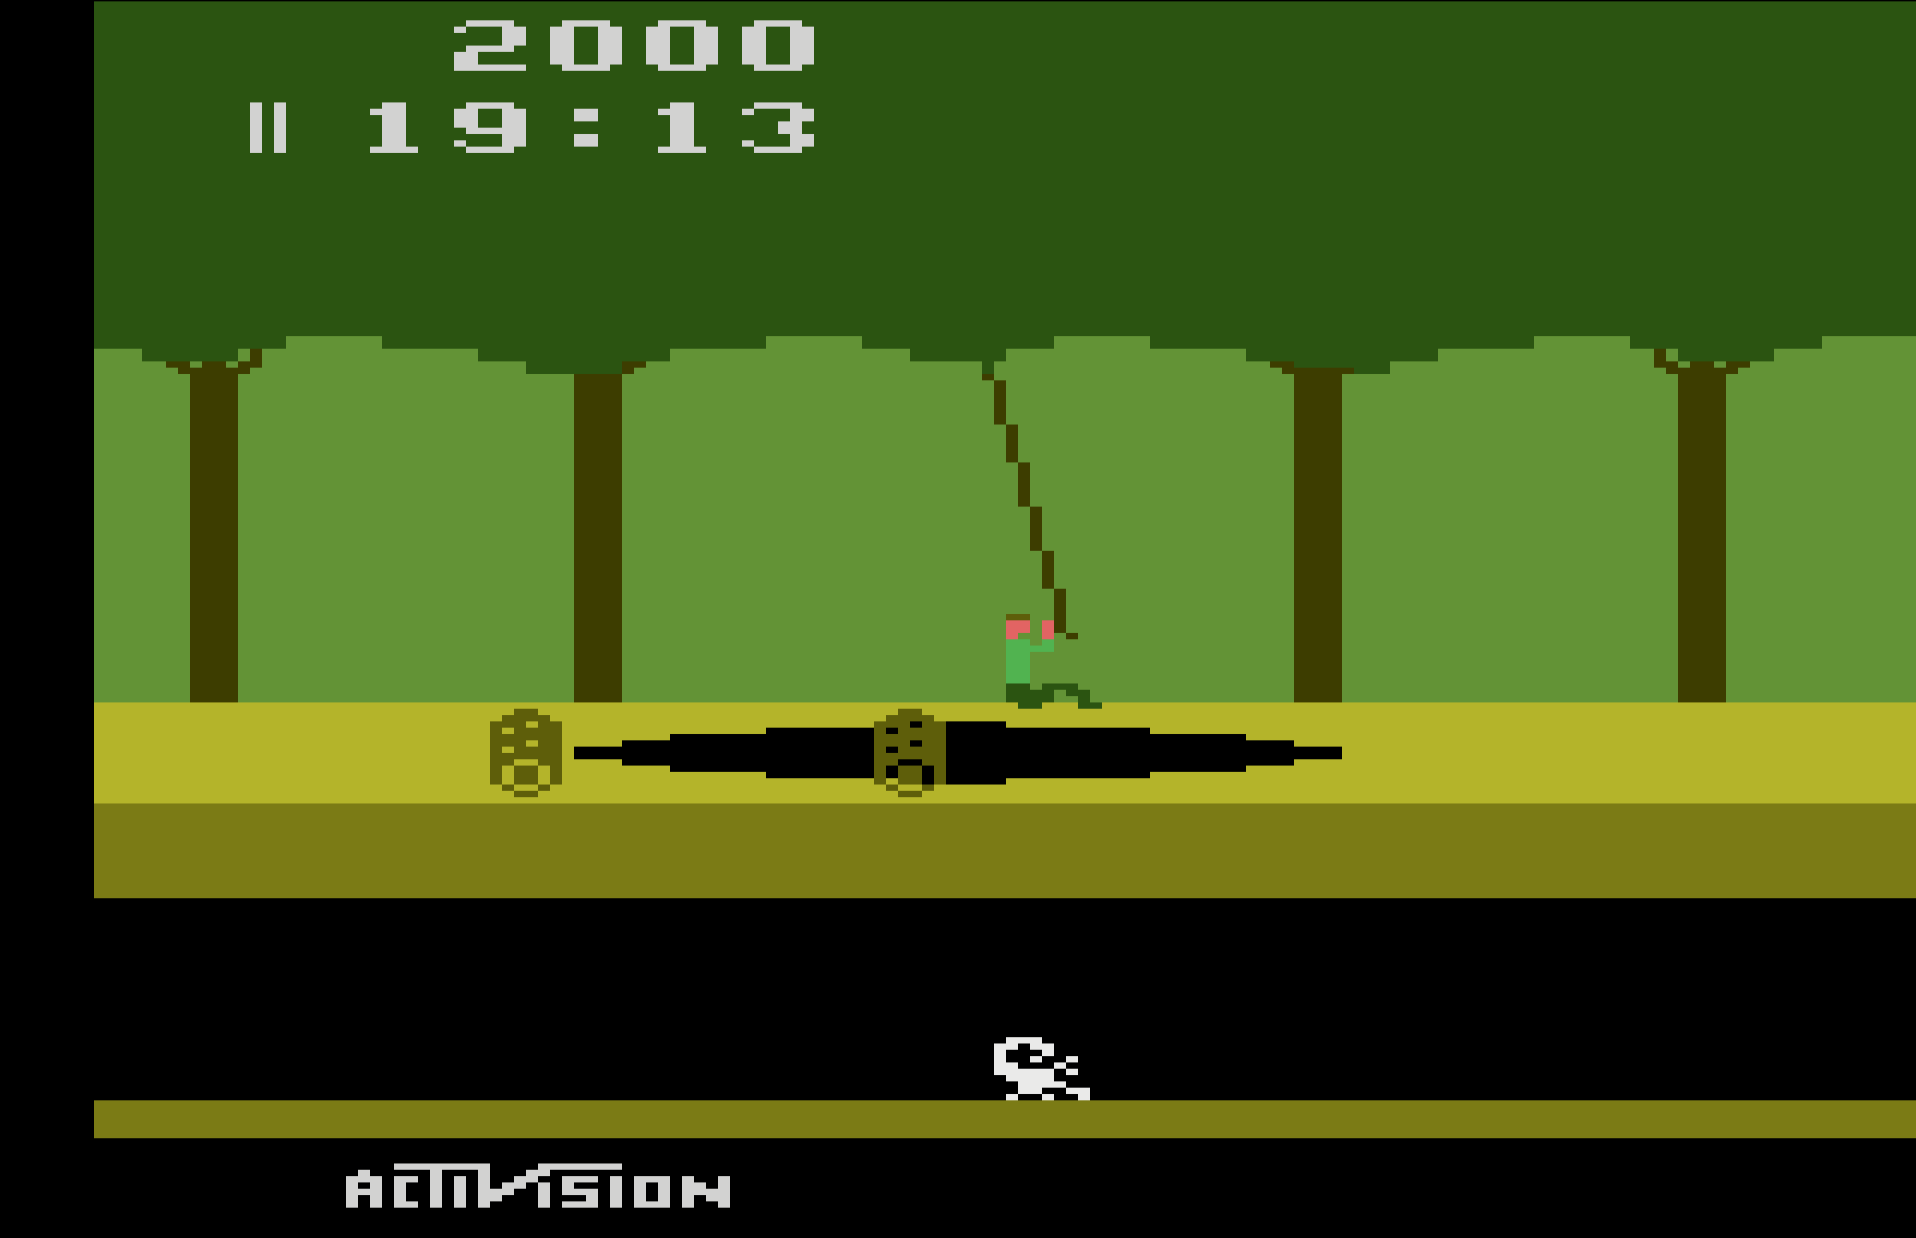
What about those sprites? Atari called them players and missiles, but the concept is the same. Players are sprites eight bits wide, and the pixels are smaller than playfield pixels. They can be positioned anywhere on the scan line, but like the playfield, they’re one-dimensional monochrome bitmaps. If the programmer wants 2D sprites (which they certainly do), then the code must constantly modify the player graphics register, updating it before each new scan line is drawn, including setting the register to zero for the areas above and below the player sprite where nothing should be drawn. Does that sound incredibly tedious? You bet!
Missiles are only one bit wide instead of eight, but are otherwise identical to players. The TIA provides two players, two missiles, and a ball that’s like a third missile. If the programmer wants more sprites than this, or wants multi-colored sprites, or anything else that the hardware doesn’t provide, then they’ll need to get fancy by combining multiple players and missiles, or else make lots of precisely-timed updates to the TIA registers to create the illusion of additional sprites and colors.
One common technique was to design games with distinct horizontal bands of activity, like Pitfall here. That allowed the same player sprite to be reused multiple times as the screen was painted from top to bottom. For Pitfall, player 0 might first be used to draw a score digit at the top of the screen. Then the same player 0 hardware resource would be used to draw part of Pitfall Harry, then to draw the rolling log, and finally to draw the scorpion. Since none of these overlapped each other horizontally, there was no conflict as long as the software could update the player graphics and position quickly between scan lines.
Atari Hardware Tricks
Under a one-dimensional hardware system like this one, collision detection would have been extremely difficult if it were left up to the software to provide. The necessary degree of bookkeeping would be too much: checking all the sprites and the playfield for collisions with each other would be virtually impossible with only 76 clock cycles per scan line, on top of all the CPU’s other critical tasks. Fortunately the TIA provides the very cool feature of hardware collision detection, at the pixel level! Any time a non-zero pixel overlaps another non-zero pixel of the playfield, a player, a missile, or the ball, a corresponding collision bit is set in the TIA, which software can later check and clear. With a total of six graphics objects there are (6*5)/2 = 15 possible collisions (an application of the Handshake Problem) to be tracked by the TIA. Nice!
Horizontal positioning of players and missiles is notoriously difficult. Most programmers would expect that the TIA has registers to specify the horizontal position of each sprite, but no. That would be too easy. On the Atari 2600, the horizontal position of a player or missile is set by writing to a special TIA register at the exact moment the electron beam passes the desired position. Think about that for a minute. The specific value that’s written to the register doesn’t matter. The program isn’t telling the TIA “put player 0 at position X”, it’s telling the TIA “put player 0 at… (wait for it) RIGHT HERE!” Thanks to this design, horizontal positioning requires synchronizing a software loop to the start of a scan line, delaying some amount of time dependent on the desired horizontal position, and then writing to the TIA register. Rather than setting a specific value for the horizontal position, the software is actually resetting one of those LFSRs in the TIA.
With the standard technique for this timing-based horizontal positioning, it’s only possible to get a horizontal resolution of five CPU clock cycles, which is equivalent to 15 pixels. To help the programmer get fine-grained control, the TIA provides additional registers that enable each sprite to be adjusted between -8 to +7 pixels from its ordinary position. It’s clumsy, but the combination of timing-based positioning plus fine-grained adjustments enable sprites to be positioned at any horizontal coordinate.
The fine-grained horizontal control involves writing to a TIA register named HMOVE, and its use leads to one of the Atari 2600’s most notorious graphical flaws: an irregular series of black lines on the left side of the screen, obscuring part of the playfield. This is often called the HMOVE comb. Here’s an example from Space Invaders:
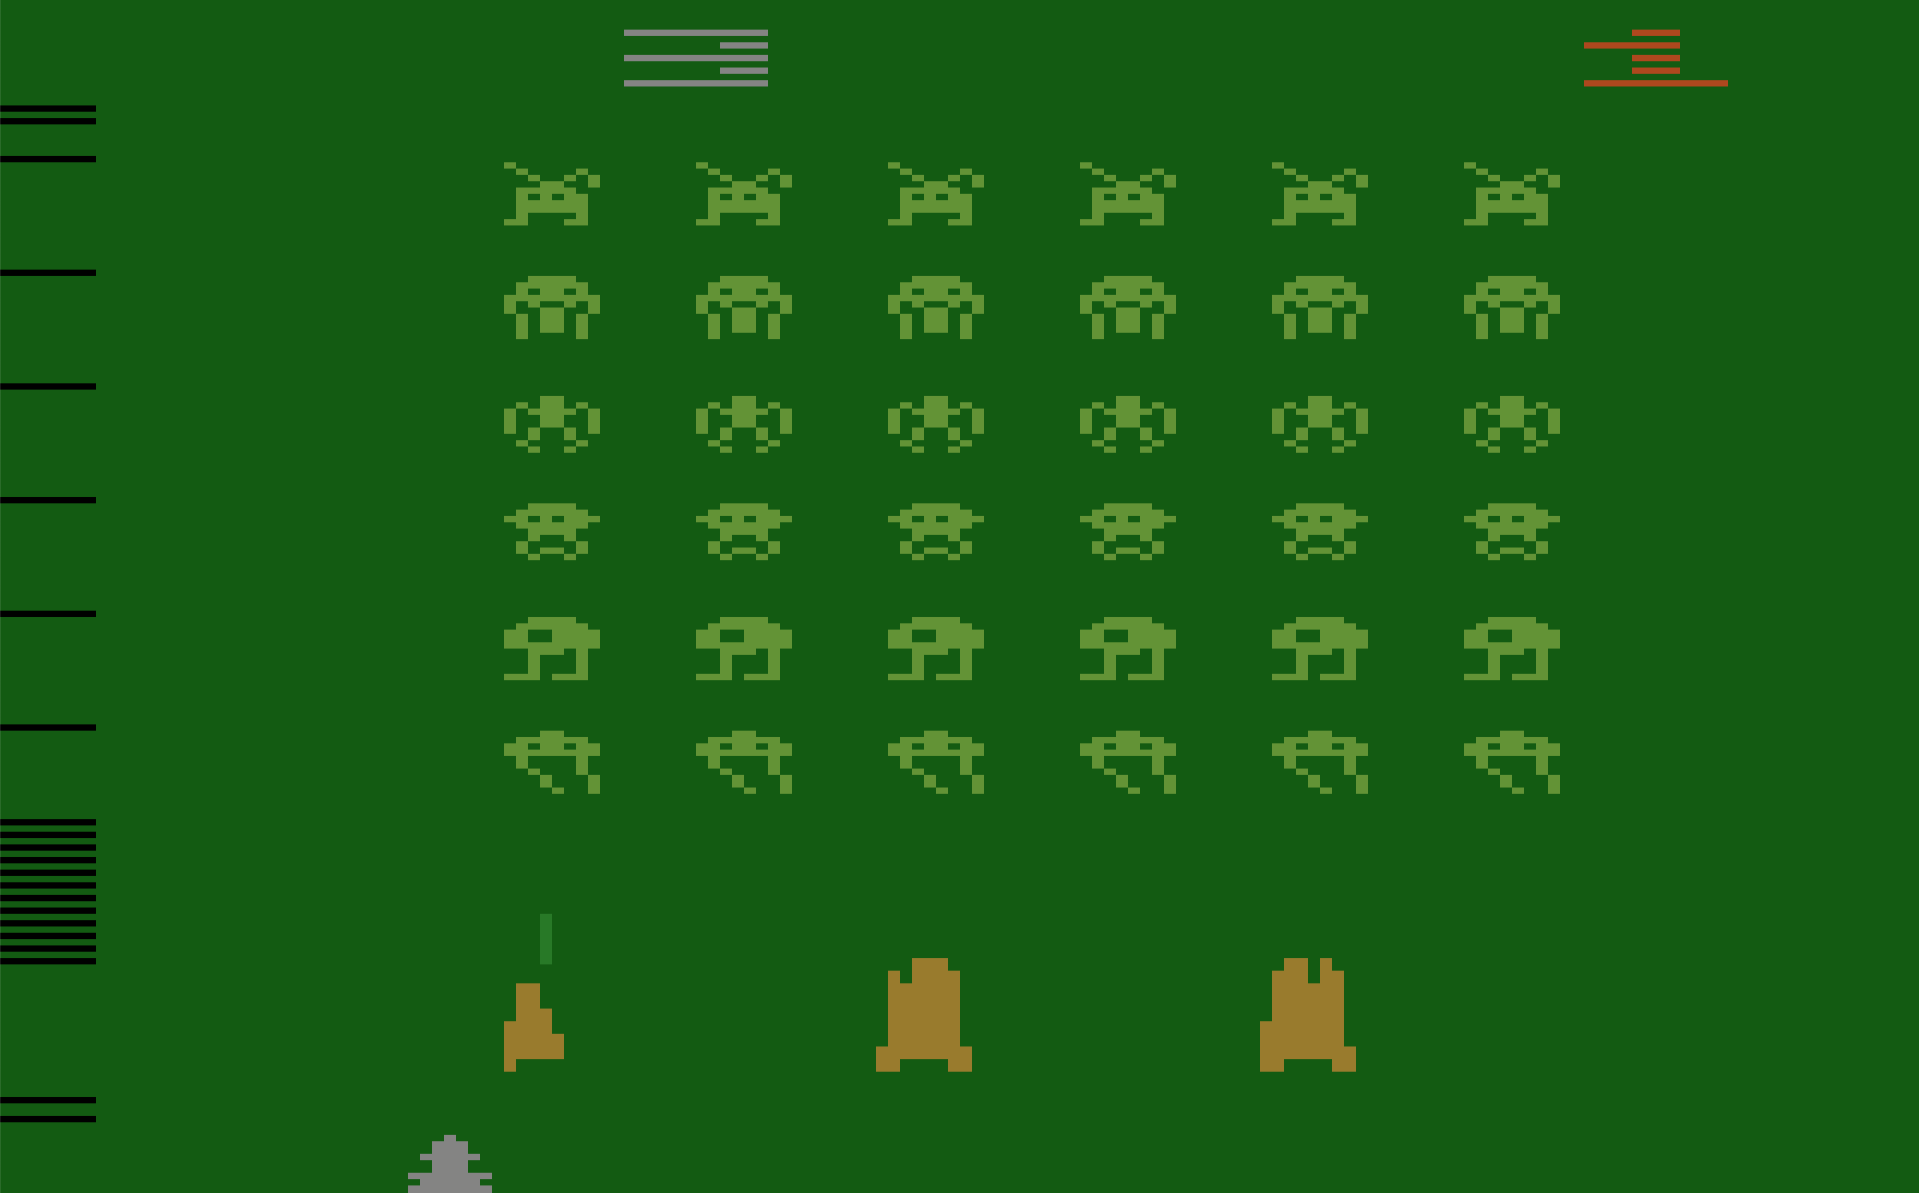
This is a side-effect of the way the TIA performs fine-grained adjustment of sprite positions, and many games exhibit this problem. Any time HMOVE is written to during a scan line, the horizontal blanking interval will be extended by eight pixels on that line, cutting off the left edge of the line. Is it a bug? An unintended feature? The exact details are much too complex to describe here, but Andrew Towers has written a very thorough explanation of TIA behavior which you’ll find at http://www.atarihq.com/danb/files/TIA_HW_Notes.txt. See the heading Playing with the HMOVE Registers.
Why do only some games display this HMOVE comb effect, and others apparently don’t? It only appears when games reuse the same sprite at different vertical positions on the screen, which requires adjusting the sprite’s horizontal position mid-frame. Space Invaders does this extensively, but simple games like Combat don’t do this. Combat is limited to the two built-in players and two built-in missiles, with no mid-frame repositioning, and therefore no HMOVE comb.
Pitfall takes a different approach, with a solid black bar at the left edge of the screen instead of a comb. This is the result of writing to HMOVE on every scan line, even when it’s not needed. Activision used this technique in many games, apparently having concluded that a solid black bar looked nicer than a partial black comb.
There are many more software tricks necessary for creating a high-quality Atari game. A non-symmetrical playfield or multi-colored playfield can be created by modifying the playfield graphics and color registers at precisely the right times, but it’s not easy! Color registers can also be modified between lines, to provide more total colors on the screen even when the number of colors on a single line is limited. Sprites can be reused and repositioned at different vertical positions, or can even be reused at the same vertical position with careful timing and attention to TIA behavior. Atari 2600 programming is a very deep topic, and it’s a long journey from bouncing ball demos to a high-quality game like Pitfall.
Atari 2600 Development Today
Want to try your hand at writing some Atari game demos? Yes you do, and it’s much easier today than it was in 1977. Start with this Atari 2600 Programming for Newbies tutorial written by Andrew Davies. Software is written in 6502 assembly language, and if you’re reading this blog, then there’s a good chance you already know it. To assemble your software, use DASM, a venerable and feature-filled cross-platform assembler for the 6502 and other 8-bit CPUs. If you’ve got a real Atari 2600 console, you can write your assembled program’s binary image to an EPROM and make your own game cartridge. If that sounds like too much bother, try the Z26 or Stella software emulators.
Did I butcher some technical explanation here, or omit important details? Please let me know! I’m just a beginner on this Atari hardware journey, with much still to learn. Look for my first 2600 game, coming soon?